
Port emulation is when a specific port is open and can be connected to, but it is not a real service and does not provide the core functionality, only mimicking a service with a similar or identical greeting upon connection.
Port emulation is often used by large companies to protect network infrastructure from service and vulnerability scanning. In simple terms, it misleads port scanners and often causes them to hang during scanning attempts.
In this guide, we will install the PortSpoof service and configure emulation for all ports except those actually used by services (22, 80, 443).
When only three ports are open and the rest are closed, a full-range port scan takes mere seconds, and anyone can identify available services by scanning the ports using the server’s IP address.
However, if we emulate the state of all ports—making them appear open across the entire range from 1 to 65535—scanning would take approximately 65,535 seconds, equivalent to about 18 hours. The information obtained would be of little value, significantly complicating vulnerability searches.
1. Installing PortSpoof
apt install git cmake build-essential autoconf automake libtool nano
git clone https://github.com/drk1wi/portspoof.git
cd portspoof
chmod +x configure
./configure --sysconfdir=/etc/
make -j$(nproc)
make install
1.1 Creating a Log File
mkdir -p /var/log/portspoof
touch /var/log/portspoof/alerts.log
chmod 644 /var/log/portspoof/alerts.log
1.2 Creating a Service File
nano /etc/systemd/system/portspoof.service
With the following content:
[Unit]
Description=Portspoof Daemon
After=network.target

[Service]
Type=simple
ExecStart=/usr/local/bin/portspoof \
  -c /etc/portspoof.conf \
  -p 4444 \
  -s /etc/portspoof_signatures \
  -d \
  -l /var/log/portspoof/alerts.log
Restart=on-failure
RestartSec=5

[Install]
WantedBy=multi-user.target
1.3 Verifying the Path to the PortSpoof Binary
which portspoof
Ensure it matches the path in the service file.
1.4 Starting the Service
systemctl daemon-reexec
systemctl daemon-reload
systemctl enable portspoof
systemctl start portspoof
To check the status:
systemctl status portspoof
1.5 Testing the Setup
telnet <IP-address> 4444
Trying 89.xx.187.xx...
Connected to 89.xx.187.xx.
Escape character is '^]'.
This indicates a successful connection. Now, configure the firewall to redirect the remaining ports.
2. Installing iptables with Persistent Rules
apt install iptables iptables-persistent
Press "Yes" in the interactive prompt for both IPv4 and IPv6.
2.1 Setting Up Rules
We’ve created several rules to exclude our services (22, 80, 443). Adjust them accordingly for your services.
iptables -t nat -A PREROUTING -p tcp -m tcp --dport 1:21 -j REDIRECT --to-ports 4444
iptables -t nat -A PREROUTING -p tcp -m tcp --dport 23:79 -j REDIRECT --to-ports 4444
iptables -t nat -A PREROUTING -p tcp -m tcp --dport 81:442 -j REDIRECT --to-ports 4444
iptables -t nat -A PREROUTING -p tcp -m tcp --dport 444:65535 -j REDIRECT --to-ports 4444
Add rules to allow our services:
iptables -A INPUT -p tcp -m tcp --dport 22 -j ACCEPT
iptables -A INPUT -p tcp -m tcp --dport 80 -j ACCEPT
iptables -A INPUT -p tcp -m tcp --dport 443 -j ACCEPT
Save the rules to persist after a server reboot:
netfilter-persistent save
Or:
iptables-save > /etc/iptables/rules.v4
ip6tables-save > /etc/iptables/rules.v6
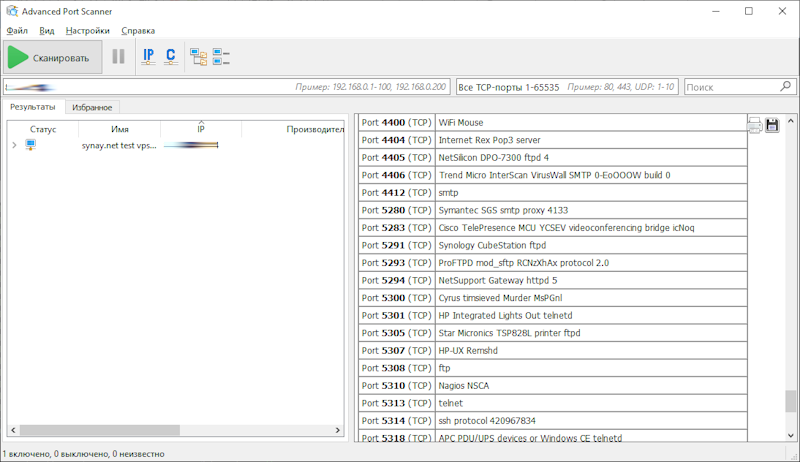
Done! You can now try connecting to any port in the range and check its output. We used a free Windows port scanning tool, Advanced Port Scanner.

As seen, the ports respond with greetings based on two configuration files:
- portspoof.conf - Lists specific ports and their responses. You can add a port and response, or for an empty response, specify the port number and "".
- portspoof_signatures - Contains signature information for all ports not listed in the configuration file.
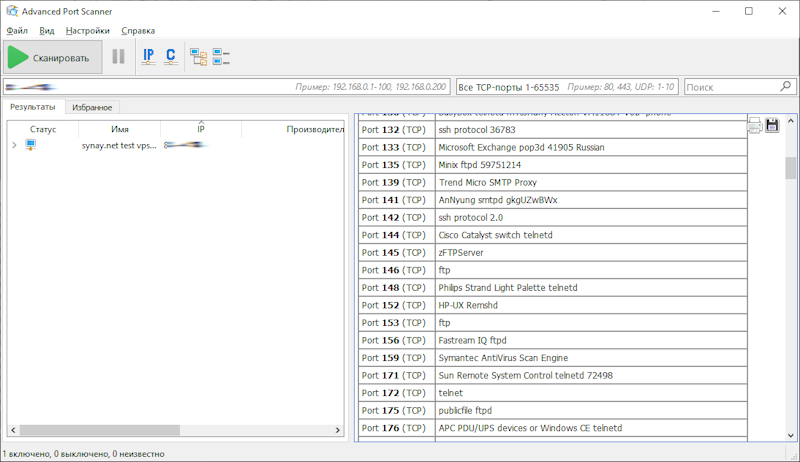
Responses (banners) are taken from these two configuration files.
After editing the files, simply restart the service:
systemctl restart portspoof
Each port has its own response. If scanning is not stopped in time, the program may hang due to the large number of ports.
Responses from specific ports can obscure the operating system, leading scanners to mistake the server for a router or even a printer.
3. Additional Steps
To disable port greetings, replace the signatures file with an empty one:
mv /etc/portspoof_signatures /etc/portspoof_signatures_orig
touch /etc/portspoof_signatures
Add a newline before EOF, or the service won’t start:
printf "\n" > /etc/portspoof_signatures
Restart the service:
systemctl restart portspoof
Now, ports not explicitly specified in portspoof.conf will return an empty response. To apply this to all ports, comment out the relevant lines in portspoof.conf and restart the service.
An empty response for a large number of ports is a better solution, as it avoids revealing which service responded.
However, if your goal is device spoofing, port responses are important, but applying this to all ports is too obvious.
After a successful connection, the connection is terminated. For scanning a large range of ports, it’s better to use the nmap utility.
4. Port Scanning with nmap
apt install nmap
4.1 Basic Scan
nmap -p 1-65535 <IP-address>
4.2 Faster Scan
nmap -p 1-65535 -T4 <IP-address>
4.3 With Service Information Output
nmap -p 1-65535 -sV <IP-address>
4.4 Saving Results to a File
nmap -p 1-65535 -oN result.txt <IP-address>