
 |
이 가이드에서는 가상 서버에 WordPress 애플리케이션을 설치하므로 매번 동일한 작업을 수행하지 않도록 Debian 12의 웹 스택. 이 어셈블리는 PHP 및 MariaDB가 필요한 웹 애플리케이션을 신속하게 배포하도록 특별히 설계되었습니다. 공식 사이트에서 최신 버전을 다운로드하고 브라우저를 통해 설치하세요. 필요한 모든 서비스가 이미 설치 및 구성되어 있습니다. WordPress가 사전 설치된 VPN 서버를 주문할 수도 있으며, 관리를 위한 로그인과 비밀번호만 지정하면 됩니다. |  |
| 1. 최신 버전의 워드프레스를 다운로드하세요 |
|
apt update && sudo apt upgrade
wget https://wordpress.org/latest.zip
apt install unzip
mkdir -p /var/www/
unzip latest.zip -d /var/www/
mv /var/www/wordpress /var/www/domain.tld
2. 데이터베이스를 생성하고 설정에 쓰기
mariadb -u root

create database wpdomain;
grant all privileges on wpdomain.* to user@localhost identified by 'your-password';
flush privileges;
exit;
이제 구성 파일에 이 모든 데이터를 지정하겠습니다 wp-config.php
cd /var/www/domain.tld/
cp wp-config-sample.php wp-config.php
nano wp-config.php

/** The name of the database for WordPress */
define('DB_NAME', 'wpdomain');

/** MySQL database username */
define('DB_USER', 'user');

/** MySQL database password */
define('DB_PASSWORD', 'your-password');
변경 사항 저장 CTRL + O, Enter 및 종료 CTRL + X
3. 웹 서비스 설정
도메인에 대한 권한을 할당하고 구성 파일을 만듭니다
chown www-data:www-data /var/www/domain.tld/ -R
mv /etc/nginx/conf.d/default.conf /etc/nginx/conf.d/domain.tld.conf
구성 파일:
/etc/nginx/conf.d/domain.tld.conf

server {
  listen 80;
  listen [::]:80;
  server_name _;
  root /var/www/domain.tld;
  index index.php index.html index.htm index.nginx-debian.html;

  location / {
    try_files $uri $uri/ /index.php;
  }

  location ~ \.php$ {
    fastcgi_pass unix:/run/php/php8.2-fpm.sock;
    fastcgi_param SCRIPT_FILENAME $document_root$fastcgi_script_name;
    include fastcgi_params;
    include snippets/fastcgi-php.conf;
  }

location /phpmyadmin {
        auth_basic "Admin Login";
        auth_basic_user_file /etc/nginx/pma_access;
    }

 # A long browser cache lifetime can speed up repeat visits to your page
  location ~* \.(jpg|jpeg|gif|png|webp|svg|woff|woff2|ttf|css|js|ico|xml)$ {
       access_log        off;
       log_not_found     off;
       expires           360d;
  }

  # disable access to hidden files
  location ~ /\.ht {
      access_log off;
      log_not_found off;
      deny all;
  }
}
서비스를 다시 시작해 보겠습니다
service nginx restart
/etc/init.d/php8.2-fpm restart
ftp 사용자의 홈 디렉토리를 우리의 홈 디렉토리로 변경하십시오:
/etc/passwd

ftpuser:x:1000:1000:,,,:/var/www/domain.tld:/bin/bash
구성을 위해 phpMyAdmin의 경로를 변경해 보겠습니다:
ln -s /usr/share/phpmyadmin /var/www/domain.tld/
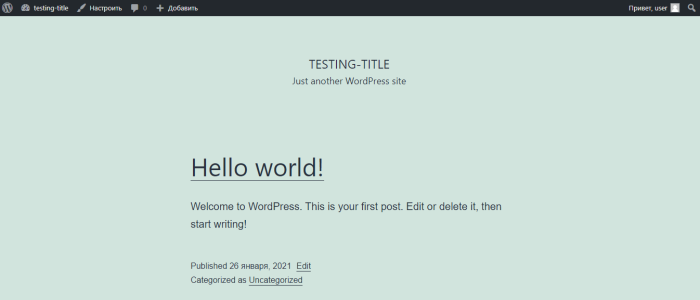
domain.tld를 DNS 편집기에 이미 구성된 VPS 서버의 IP 주소로 변경합니다. 따라서 비유를 통해 여러 사이트를 추가할 수 있습니다. 구성된 http://domain.tld/ 도메인을 사용하여 브라우저로 이동하여 브라우저에서 설치를 완료합니다. 관리자 사용자 이름과 비밀번호를 입력하라는 메시지가 표시됩니다. 이것으로 설치가 완료됩니다. 사이트 이전의 경우 기존 파일을 배치하고 데이터베이스를 가져올 수 있습니다.
이제 브라우저에서 http://server_ip/와 같은 링크를 열고 애플리케이션을 테스트할 수 있습니다.
관리 메뉴에 들어가려면 양식의 링크를 따르십시오 http://server_ip/wp-admin
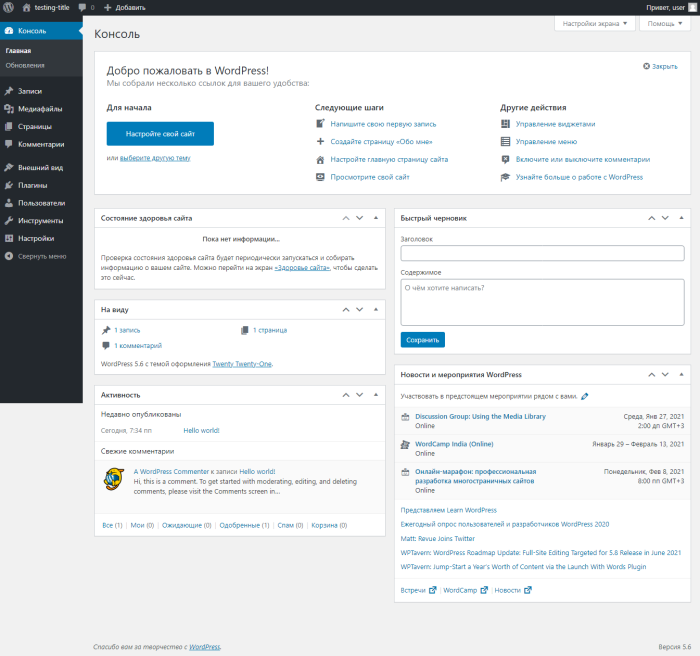
워드프레스 설치가 완료되었습니다.
No Comments Yet